Week 1
During week 1, different methods of operating a mechanical eye were researched. Materials and costs were also researched as they are important for a plausible design.
Category
|
Projected Cost
|
Servos (6)
|
$53.94
|
Servo Controller
|
$19.95
|
Mechanical Parts
|
$21.56
|
Structural Parts
|
$36.13
|
TOTAL
|
$131.58
|
At the present, the design consists of an animatronic eye mounted on a plate which will rotate horizontally. This assembly will also be set to rotate vertically.
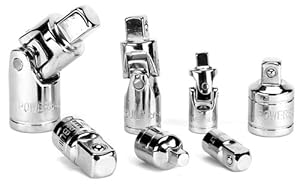
We have decided that we will be using the Powerbuilt 640859 Adapter and U-Joint Set for the eye movement. This will allow the servos to move the eyeball with more free motion.
We also have been looking at various materials for the outer shell of Wheatley, including different sized hamster balls.
We have been working on the internal design of Wheatley in the AutoCAD Inventor software. We have figured out servo placement and the parts that need to be printed. Currently, the parts that need to be printed are the eyelids.
The internal design, so far, includes a foam board for support and mounting, 4 TS-6 nano servos, 2 eyelids, a flashlight for an eyeball, and a U-joint for free movement of the eye.
We have made a test model of the internal design of Wheatley. A foam board was cut into the necessary shape, and two eyelids were printed out in the 3D printer. The current task at hand is creating a mounting piece for the dismembered flashlight in order for the eye to be properly attached.
We have created the eye mount which houses the LED "eye" and attached it to the U-Joint. The eye mount was then attached to the servos so that it could move up/down or left/right. The LED eye will be connected to the servo controller using soldered wires attached to the spring on the back of the LED eye and one of the solder mounts of the LED circuit board.
Next, we will be purchasing a 7 inch in diameter hamster ball as the outside casing. The casing will hopefully be painted white so that it may resemble the fictional character as well as being able to mimic some of its movements.
During week 6, we created a new plate to mount the eye on.
This was created using two pieces of 3/16 inch white foam board. It was cut in a shape similar to first version, but this time the eye and eyelid mounts were clued into place, as opposed to taped. The plate now has all four servos needed for operating the eye. From left to right, the first and third servos move the eyelids, and the second and forth servos move the eye.
This week we also replaced the red mount for the LEDs, because the last one was two frail to be used.
This version has thicker extrusions for the connection between the eye mount and the servos (pictured here on the top and right of the eye mount).
This week, we mounted the previously made foam plate on a fifth, larger servo which is capable of rotating the disk.
The fifth servo is help by the foam disk below the eye mount plate. The head of the servo is taped to the box that has been glued to the bottom of the plate.
This is a video displaying which parts are movable as of this date.
Week 8 was solely devoted to coding and tweaking. For more info on the coding, go to the Weekly Algorithm Design tab.
Many finishing touches are being done this week. A simple circuit consisting of a switch, a battery, and a set of LEDs from a torn apart flashlight was soldered together in order to illuminate Wheatley's eye.
Below are two test videos of the Wheatley animatronic. This first video is a basic eye illumination test, in order to see if the circuit was properly implemented. The second video is a basic movement test so that we could see if each servo was moving properly when encased.


Week 2
We have decided that we will be using the Powerbuilt 640859 Adapter and U-Joint Set for the eye movement. This will allow the servos to move the eyeball with more free motion.
 |
| Powerbuilt 640859 Adapter and U-Joint Set |
We also have been looking at various materials for the outer shell of Wheatley, including different sized hamster balls.
Week 3
We have been working on the internal design of Wheatley in the AutoCAD Inventor software. We have figured out servo placement and the parts that need to be printed. Currently, the parts that need to be printed are the eyelids.
 |
| AutoCAD design of internal system. |
Week 4
We have made a test model of the internal design of Wheatley. A foam board was cut into the necessary shape, and two eyelids were printed out in the 3D printer. The current task at hand is creating a mounting piece for the dismembered flashlight in order for the eye to be properly attached.
 |
| Right Side |
 |
| Front (Eyelid Closed) |
 |
| Front (Eyelid Open) |
Week 5
We have created the eye mount which houses the LED "eye" and attached it to the U-Joint. The eye mount was then attached to the servos so that it could move up/down or left/right. The LED eye will be connected to the servo controller using soldered wires attached to the spring on the back of the LED eye and one of the solder mounts of the LED circuit board.
 |
| Front (Eyelid Open with LED "Eye") |
Next, we will be purchasing a 7 inch in diameter hamster ball as the outside casing. The casing will hopefully be painted white so that it may resemble the fictional character as well as being able to mimic some of its movements.
Week 6
During week 6, we created a new plate to mount the eye on.
 |
| Internal Top View (with Hamster Ball) |
This week we also replaced the red mount for the LEDs, because the last one was two frail to be used.
 |
| Front (Eyelid Open with Hamster Ball) |
Week 7
This week, we mounted the previously made foam plate on a fifth, larger servo which is capable of rotating the disk.
 |
| Side View (Eyelid Open with Hamster ) |
This is a video displaying which parts are movable as of this date.
Week 8
Week 8 was solely devoted to coding and tweaking. For more info on the coding, go to the Weekly Algorithm Design tab.
Week 9
Many finishing touches are being done this week. A simple circuit consisting of a switch, a battery, and a set of LEDs from a torn apart flashlight was soldered together in order to illuminate Wheatley's eye.
Below are two test videos of the Wheatley animatronic. This first video is a basic eye illumination test, in order to see if the circuit was properly implemented. The second video is a basic movement test so that we could see if each servo was moving properly when encased.
The next video is a short clip of our code at work. We have the animatronic act out the part in the game where Wheatley is giving the protagonist "jumping tips."
Week 10
This week consisted of finishing touches, including the outer covering, painting, and final coding. The inner sphere (hamster ball) was painted grey to match the real Wheatley's inner sphere, and the eye casing that contains the LEDs was painted black. The outer shell was made with wire mesh so that it would be sturdy enough to support the weight of the inner sphere and all of its workings. The inner sphere is supported by the outer casing by the means of a sixth servo and a metal pin. Once assembled, the outer wire mesh casing was covered in small foam squares in order to prevent tearing in the cloth that now covers it.
 |
| Front View (Painted and Inside Outer Casing) |
Outer Casing Covered Foam Squares (to Prevent Cloth Tears)
 |
| Front View (Final Product) |
Finally, we present the finished product. A fully animated Wheatley that just wants to give you tips on how to jump. Cheers!
No comments:
Post a Comment